Buying a new home is one of the biggest milestones in life. It is supposed to be perfect, but more often than not, newly built properties come with minor defects or cosmetic issues that need fixing before you fully settle in. This is where a new house snagging list template becomes an essential tool for any homeowner. By having a structured way to document these issues, you ensure that the builder takes responsibility for repairs while the property is still under warranty.
Think of a snagging list as your final quality control check. While developers have their own inspectors, their standards might not always match your expectations. Walking through your new rooms with a critical eye allows you to spot things like uneven paint, loose handles, or poorly fitted kitchen units. It is much easier to get these things sorted while the contractors are still on site rather than trying to book them months after you have moved your furniture in.
Why You Need a Detailed Checklist Before Moving In
Moving day is usually a whirlwind of boxes and bubble wrap. In the middle of all that chaos, it is easy to overlook a scratch on the window or a radiator that does not heat up properly. A detailed checklist helps you slow down and look at the house as a structure rather than just a future home. You want to make sure every penny you spent is reflected in the quality of the finish and that no corners were cut during the final stages of construction.
Most builders provide a short period during which they are obligated to fix cosmetic defects. If you do not report these issues early, they might claim that you caused the damage while moving your belongings. Taking photos and notes systematically ensures there is a clear paper trail. It gives you peace of mind knowing that you are protected against sloppy workmanship and that the developer is held accountable for the promises made in your sales contract.
It is not just about aesthetics either. Some snags can be functional or even safety related. A door that does not latch properly might be a security risk, and a leaking pipe under the sink could lead to mold issues down the line. By being thorough now, you prevent small problems from turning into expensive repairs in the future. It is much better to deal with a bit of dust from a repair man now than a major renovation project two years later.
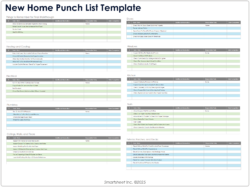
To make the process smoother, you can organize your inspection room by room. This prevents you from feeling overwhelmed and helps ensure you do not miss the smaller details like the sealant around the bathtub or the alignment of the electrical sockets. Having a clear plan makes the whole experience less stressful and ensures that you cover every square inch of your new property. Here are a few key areas to focus on during your walk through:
- External brickwork and mortar joints for any cracks or gaps
- Proper installation of loft insulation and ease of access
- Operation of all windows and doors to ensure they open and close smoothly
- Consistency of paint finish on walls and ceilings under different lighting
- Water pressure and drainage in all sinks and bathrooms
- Level flooring and the quality of carpet or tile fitting
Making the Most of Your Inspection Walkthrough
When you finally get the keys and head inside for your inspection, try to bring a friend or family member along. A second pair of eyes is incredibly valuable because they might spot something you have missed while you are distracted by the excitement of your new kitchen. Make sure the house is well lit and try to visit during daylight hours so you can see every detail clearly. It is also a good idea to bring a torch for checking dark corners or inside cupboards where light might not reach.
Do not be afraid to test everything. Turn on every tap, flush every toilet, and flick every light switch. Plug a small device like a phone charger into every socket to ensure they are all live and safe to use. Check that the heating system responds quickly and that the thermostat is functioning as it should. It might feel a bit tedious to go through every single component, but these are the things that will frustrate you the most if they do not work when you actually need them after a long day of work.
Once you have completed your walkthrough and filled out your new house snagging list template, send a formal copy to your developer. It is best to do this via email so you have a record of the date and time it was sent. Ask for a timeline on when the repairs will be completed and keep a copy for yourself to tick off as the work gets done. Clear communication is the best way to maintain a good relationship with your builder while still getting the quality you deserve for your new investment.
In the end, snagging is just a normal part of the home buying process. No new build is ever truly perfect, and builders expect a certain amount of feedback from buyers once they take possession. By being proactive and organized, you take control of the situation and ensure your investment is protected. It is worth the extra few hours of effort to make sure your home is exactly as it was promised when you first looked at the floor plans.
Once all the snags are resolved, you can finally relax and enjoy your new space without any lingering worries about faulty hinges or peeling wallpaper. Your home is a place for making memories, and starting off on the right foot with a snag free property makes those memories even better. Take your time, be thorough, and look forward to a comfortable life in your brand new house knowing that everything is exactly as it should be.